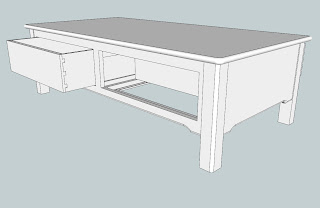
It's time I introduced you to the coffee table. It's a Tony V original design intended to replace a coffee table we bought when we first got married almost 15 years ago.
There's a funny (as in unusual, not "ha-ha") story behind the coffee table the new one will replace. My wife is from the next town up from where we live now, called Mahopac, NY. When we got married, there was an unfinished furniture store not far from where we live today. We bought that coffee table from there. Today, the unfinished furniture store is gone, but that same store is now the Tool Nut, which is where I buy a lot of my router bits and other tools!
In any event, A lot of the furniture in the family room, where the old coffee table is, and where the new one will go, was purchased, or designed, to go with the coffee table. I think we even have an end table that goes with it in the attic. So I wanted the new coffee table to be reminiscent of the old one, but with some changes my wife wanted.
Essentially, my wife wanted the new table to have some storage in it so we could cut down on the clutter in the family room. My kids—well, actually, my son— has a lot of stuff in plastic bins that are tucked into various corners. Most of it is games & accessories for the Wii and the old GameCube systems we have. So I needed to add some drawers to the table that will allow us to get rid of the bins. It also needs to sit in the same footprint, as our family room is only 10' wide. Actually, it's on the other side of the wall that separates the wood shop from the house, so the new table won't have far to go once it's done.
So here are some views generated from SketchUp of the coffee table as I have designed it.
Here is an isometric view of the table. As you can see, the drawers are designed to open from either side. This will allow the kids to get at some things from one side & other things from the other side, and allow us to use all of the space inside the table for storage.
The drawers, as designed, will feature half-blind dovetails. I've never made dovetails of any type, so this will be a first for me.
The drawers also will not use metal drawer glides. Instead, they are designed to sit on waxed wooden glides. There will be rare-earth magnets hidden in the sides of the apron & drawer faces that will help keep the drawers lined up with the apron when they're closed. At least, I hope they'll keep everything aligned!
Here is a front view of the table. This is pretty much how the table will look from the other side, too. The edges of the top are designed to have a full 3/4" diameter bullnose, just like the table it's replacing. Since the corners are also rounded, I'm probably going to have to make a full size template of the top and use a guide bushing in my router base to do the bullnosing. This will be pretty interesting to do!
The bottom edges of the all 4 aprons / sides have a decorative cut-out & 3/16" radius round-over. These I will be able to do with a regular bearing guided round over bit in my router table. This pattern, by the way, is taken from the existing coffee table.
The drawer fronts will be made by taking an over-width blank for each long apron & ripping them out. The parts, minus the draw fronts, will then be glued back together. This will allow the grain on the drawer fronts to match perfectly with the rest of the grain on the aprons. The drawer fronts themselves will then be ripped a little narrower to give them enough clearance for the drawers to open & not bind, and allow for wood movement.
 Just for fun, I threw in this bottom view of the table. There will be two frames inside, one beneath & supporting the drawers, the other one identical to it & above the drawers, keeping them from tilting out when you pull the drawer out far. These will be dadoed into all four aprons / sides & cut out to go around the legs. The long grain on all four arpons / sides will run from leg to leg, so there will be no cross-grain issue with this construction.
The aprons / sides will be attached to the legs using mortice & tennon joinery. Due to their width (about 14", I think), there will be several tennons cut in each apron. I'll probably have to allow glue the middle tennon in and peg the others, with elongated slots cut through the tennons to allow the aprons to move. I'm not real clear on the proper joinery technique to use; perhaps some of my more knowledgeable readers can suggest something?
Finally, here is a top view of the table. It's nothing much to look at right now, really, but I figured I'd include it anyway.
Well, that's the coffee table! See you next time!
Next: Not another long list of building steps!


1 comment:
really cool,..
Post a Comment