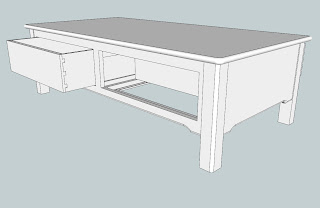
There has been a design change to the coffee table. I posted a couple of the pictures in my last blog post in a thread on WoodNet & got a range of feedback, mostly that the drawers were too big. So I decided to add two more drawers 2" high above the existing drawers. I don't know if they'll make the tall drawers look better or not, but they do add additional storage, which is a good thing.
So here are some renderings from SketchUp of the new design.
 Here is the coffee table in an isometric view. You can clearly see the new drawers, which are 2" tall in total. The sides are now all 13" + wide. There are going to be three tenons 3" long on each one. I also realized that I'm going to have to glue & peg the top tenon into the legs, but leave glue off of the middle & bottom tenons. These will need elongated slots cut in them with pegs going through the slots & glued into the legs. These will keep the top of the side in the same place with regard to the top & allow the sides to expand downward with seasonal movement.
 This is the front of the new design. Both sets of drawers will be able to be opened from either side. I will use some rare earth magnets mounted in holes drilled into the drawer openings on all 4 sides, and similar magnets mounted in holes drilled into the drawer fronts & hidden under thin plugs. The magnets will all be oriented so they attract each other. These should help keep the drawers aligned to the apron face. I don't know how many I'll need; I will have to experiment.
I got an interesting tip on WoodNet to use something called "Nylo-tape" instead of wax on the drawer glides. From what I can gather, this is some kind of tape, adhesive on one side, that is slick & will allow the drawers to pull open easily. This lead me to think about making the drawer glides & guides out of UHMW. I don't know if I'll do it, but it is a thought!
 This is the bottom view. Except for the new drawers sticking out, there really is nothing different to see here. An interesting change is now there will be three dust frames to build. The middle frame will have two 1/4" deep dadoes cut in the top & bottom of the center rail to accept drawer dividers. I expect the carcase of this piece to be strong as steel & not to rack at all.
Also, since the legs will be joined to the sides using mortice & tennon joinery, they won't give us the headaches the existing table's legs have given us. The legs on the existing table are removable. These legs are made from 2 3/4" thick pieces glued to each other in an "L" shape. At the top, there is a block with the ends mitered at 45º that was glued to the inside of the legs. These blocks have lag bolts driven into them. These bolts fit through similar blocks attached to the undeside of the table top. The legs are held on by a washer & nut.
Well, these blocks were glued & finish nailed to the inside of the legs. Over the years, the glue has failed & the nails were pulled out on a couple of the legs. I've epoxied the blocks back on, and the repair is holding for now. I just don't know how long the repairs will last.
 Here is the top view. Nothing much to look at, I'm afraid. But if you were standing on it & looking straight down, this is what you'd see!


