Saturday, May 31, 2008

My Next Project: A Pulpit

My family & I have been going to Higher Ground Ministries in Danbury, CT for almost a year now. Our pastor has this pulpit which she was given by another pastor when the church opened. The pulpit was made from a sheet of 1/2" plywood & was not very well made. It was functional, but I don't believe I've actually seen her stand behind it & deliver a sermon.

Back in March, I asked my pastor if I could make a new pulpit for her, and she agreed. So began a three week period of designing a new piece in between church, work, family obligations, and actually making progress on the corner cabinet.

I started by researching pulpits on the Web. My first attempt was based upon a web site I found where the author built a lectern & documented what they did. It was intended to be portable for use in demonstrating products in super markets, but I figured it was a good starting point. I showed that to my pastor & she liked it, but she wanted it to be bigger with wings off to the side. So it was back to SketchUp for another attempt.

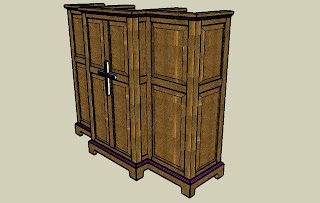
The following pictures show what I finally came up with. When I did these drawings, I "painted" everything to give the best impression of what the finished product would look like. Pastor has signed off on this design, so it is what I will be building.

The Pulpit

The image above shows a 3/4 view of the pulpit. It will be made primarily from solid plain sawn red oak. Plain sliced red oak plywood will be used to make 4 inner partitions and the shelves, except for the lectern shelf, which will also be made from solid red oak. The moldings will be made of purple heart and hard maple as a trim. This purple heart & maple motif will be repeated in the cross decorating the front.

The image on the left is a front view of the pulpit. The image to the right is a side view, while the picture below left shows the pulpit from the rear and the one below right shows the lectern, from the view point of someone standing behind the pulpit. The last two pictures show the molding details.

When finished, the pulpit will consist of three separate units that will be bolted together. I'm building it this way because the finished unit wouldn't fit in my mini-van without being able to break it down.

The central unit will be 24 1/2" at the widest and 19 1/4" deep; the two wings will be 16 1/2" at the widest and 14 3/4" deep. All three units are 48" tall. I used the Golden Ratio when determining the dimensions in an attempt to make the proportions as pleasing to the eye as possible.

The top & bottom shelves in all three units are fixed & help keep the units square. The other three shelves will be adjustable using shelf pins. The unit will be free standing, so everything will stand on adjustable feet so it can be leveled & kept from rocking. And the lectern will be removable, so a laptop can be put on the center top shelf & used to reference notes.

Lastly, here's a close-up of the cross on the front.

The cross will be made from a 1/4" ply backer cut into the shape of the cross. Pieces of purple heart approximately 1/2" thick (a little more to make up for the 1/4" ply's thickness being less than 1/4") will be mitered, cut to length, and glued to the backer. I'll probably use 1/2" pin nails through the backer into the purple heart to help hold everything together "while the glue dries." Lastly, 1/4" thick by 3/4" wide maple will be mitered & wrap the purple heart. This will then be screwed onto the front. The screws will be driven from the inside through the front & into the back of the cross.

As for finish, all of the purple heart & maple will be covered with a coat of shellac as a seal coat & to keep the stain from affecting the color. The red oak will be stained with golden oak stain to match an existing red oak piece in the Sanctuary. The whole thing will then be finished with water borne polyurethane to keep the color from changing & provide the protection the piece will need.

It's my intention to put a power strip in the pulpit to power a lamp that will be attached to the centere front cap rail and any laptops that are used with the pulpit. I also want to attach a microphone support to the center right front corner. I'll have to cut a channel in one of the center front posts to run a power cord to the power strip.

Next time, another exhaustive list of steps needed to make this project.
I Finally Bought a Jointer

A few weeks ago, I bought a 6" jointer. I've been putting off buying a jointer for the last few years until I finally have a real work shop, but I decided that I needed a jointer a lot more than I was willing to admit to myself. Using the DJ-20 at WoodCraft on the corner cabinet project just brought it home to me a lot more forcefully.

I went with the 6" because my space is just so small & I think an 8" will take up too much room & make my cramped space even harder to maneuver in than it is now. The 6" seemed like a good place to start. I can always sell it & upgrade to a larger model if I ever have the space of perceive the need.

I decided to go with the Grizzly G1182ZHW. This machine is made in Taiwan, not mainland China. It's been discontinued, but I figured it'd be a good machine to have.

I ordered the machine over the phone on a Saturday morning. I paid for the extra for lift gate service, and I ordered the Shop Fox mobile base that went with the jointer. I heard from the trucking company on the following Tuesday that it was in their depot. I arraigned for it to be delivered on Wednesday between 1 & 5 & I took the day off.

The truck roared past my home at 2:40 pm on Wednesday, went up to the cul-de-sac, turned around, and roared to a stop across the street from my house. The driver jumped out and unloaded the two boxes, one at a time, and dropped them off inside my garage. The only damage to the carton was a small hole about the size of a dime in one corner. After I signed for it & tipped him, he headed on his way.

The jointer went together pretty much without incident. Getting the top (the actual jointer assembly) out of the styrofoam took a bit of effort. There's a lot of cast iron in there! Mary & I got it out with only a little difficulty & were able to put it on top of the stand without any problems.

The cosmoline seemed to have dried out while the unit was at the Grizzly warehouse. It took a lot of WD-40 to soften & remove all of it. Eventually I got all of it off, though there may be bits & pieces of crud left in the cutter head assembly.

After cleaning it off, I put on a coat of Boeshield T-9 & 2 coats of paste wax and then proceeded to tune up the tables. It took a while for me to get the outfeed table adjusted properly. I ended up going to WoodNet & I found a posting by Joe Grout that suggested making a 3" or so long partial pass on a stick, turning off the jointer, then raising the outfeed table until it just kissed the underside of the stick. This worked like a charm.

So here are some pictures of the newest addition to the Woodshop!

Monday, May 26, 2008

The Corner Cabinet Is Finished!

Well, I finally finished the corner cabinet today. It's been about 7 months or so of interrupted work / fun, but it's finally done. And I am incredibly happy with the way it turned out. And my wife's happy with it, too.

When last we met before Safety Week, I had finished the first four steps of the five step finishing process. To refresh your memory, those steps are:

  1. Dye the wood with Brown Mahogany TransTint dye, 1 oz of dye diluted in 1 quart of distilled water.
  2. Apply one coat of Waterlox Original Sealer Finish. Allow to dry over night.
  3. Sand with 320 grit paper.
  4. Glaze with Walnut Bartley Gel Stain, to even the color & pop the grain.
  5. Apply 4 wiped on coats of Waterlox Satin Finish.

The first four steps only took about a week to get done, with a couple of hours put in after work in the evenings a couple of nights in the week. It took about 2 weeks to finish step 5 because I had about the same amount of working time each week & I had so many parts to finish & only 10 Painter's Pyramids. If you recall, I received these for Christmas & they worked great in this application. I just needed a lot more than I had. I've ordered them, but they won't be able to help me with this project.

I believe that the solvents & chemicals in the Waterlox products had negative effects on my family's health while I was using it. We all came down with what seemed to be sinus infections after the first week of finishing. I didn't have any time to apply the final coats on the doors & shelves in the middle of last week, so I didn't get to them until Friday & Saturday. My son seems to be most sensitive, as he started having some trouble breathing while lying in bed on Friday.

I finally applied the last coat of Waterlox Satin Finish on Saturday morning, while waiting for my guests for a family barbecue to arrive. I was able to leave the garage door open all day while that was drying. Luke had a little trouble that night, but he was fine last night.

We ended up going to one of my sisters-in-laws' house for a barbecue yesterday afternoon, so I didn't get a chance to do a thing on the cabinet on Sunday. But today was another matter.

After the fourth coat had been applied, I noticed that the build-up & sheen on the piece did not match the build-up & sheen on the pieces I am trying to match. The finish on these seemed to be more of a semi-gloss polyurethane that completely filled the grain.

I had posted a question on on WoodNet as to whether it was possible to apply polyurethane on top of the WaterLox. My thinking was I could probably brush on one coat of poly & match the build-up & finish, as I had already matched the color. The responses I got indicated it was possible, but a number of people questioned the look.

In the end, I decided not to apply any poly. It would have just added more time to the finishing process, and I didn't feel that the finish had to match exactly. And I really need to get started on my next project.

So what did I do to finish the finish? Simple: I went out this morning to the local Ace Hardware & bought a package of 0000 steel wool. I rubbed the parts with the steel wool, then cleaned up the dust with a Norton micr0-fiber tack rag I picked up a few weeks ago. These things are great -- you mist them with water & wipe. They just pick the dust right up & leave no residue of any kind. You can machine wash these things & re-use them.

After wiping down, I then applied some Butchers Bowling Alley Wax. This is the only paste wax I have on hand at the moment, and I normally use it to wax my table saw & jointer tables. But it worked fine in this application. After applying the wax, I took my steel wool & wiped some more, in the direction of the grain. I then buffed the wax with a cotton cloth. The resulting sheen was nicer & more pleasing to this beholder's eye.

Below is the base cabinet finally in the house, out of the garage, near the china cabinet which was the piece I used to determine the details of the corner cabinet. You can see that the color match between the two cabinets is very close.

On the left you see the two carcases stacked on top of each other in their new home, the corner of the dining room. At this poing, the two carcases have been screwed to each other (I have screws driven up through the top of the bottom cabinet into the legs of the top cabinet. This lets the two cabinets act as one unit).

On the right, you can see the upper cabinet head-on in its corner. The dining room table is in the way of the lower cabinet, I'm afraid, so I don't have a head-on shot of that. I do, however, have the shot below.

The next step after joining the two cabinets together was to hang the doors for the last time. So I grabbed my hardware & got to it. This went easily enough -- all the headaches during the initial hanging weren't repeated at this point. After hanging the doors, I had to mount the four door catches -- two on each door, one at the top & one on the bottom. This went reasonably well, though I did somehow strip the heads off of the shanks on three of the screws. Lastly, I put the shelf pins into their holes & mounted the shelves into their new home.

You can see the finished cabinet with everything installed & the doors closed in the picture on the left, and with the doors open in the picture on the right.

As I've said, I'm extremely happy with the way it came out. A cousin of mine, who came over for the barbecue on Saturday, was looking at it while it was still in the garage & remarked that it looked flawless to him. I didn't bother to point out the defects -- it's amazing what some stain & putty can hide!

Thanks everyone who has been following this project. It's now time to move on. I'm going to get started on the next project this weekend. This will be a pulpit I'm making for our pastor. I will be posting about that project soon.

See ya in the funny papers!

Sunday, May 11, 2008

The Finishing Continues

When last we met, I had finished dying the entire cabinet with brown mahogany TransTint dye diluted 1 oz to 1 quart of distilled water. I'm happy to say that I've been able to make some progress since then and as of this moment, the project is a lot closer to being finished than it was for that last post.

To review, this is the finishing schedule I'm following:

  1. Dye the wood with brown mahogany TransTint dye
  2. Apply one coat of Waterlox Original Sealer & Finish
  3. Sand with 320 grit paper
  4. Glaze / tone with Walnut Bartley's Gel Stain
  5. Apply 4 wiped-on coats of Waterlox Satin Finish

I performed all of these steps on some sample pieces. When I got to 4 coats of finish on the samples, the sheen just looked wrong. There wasn't enough of a build-up of finish and the wood really didn't look like the pieces I'm trying to match. Frankly, the finish looked too much like wood that had been dyed & glazed but not really finished. There was a tiny bit of buildup in one area of a test board & I knew that was what I wanted the rest of the board to look like.

So I applied another coat of the finish and everything was much better, but not perfect. This tells me that I'm probably going to need about 6 or so coats of finish on the actual cabinet. The total effect, at this point, was good, though the dining room furniture has more of a gloss sheen than this will have, but that's OK.

So I got started applying the Waterlox Original to everything. This took a couple hours, as I had to cover a fair bit of surface area. I have two doors two doors and four shelves to finish, and, using the Painter's Pyramids I got for Christmas, I could only do the two doors, wait for the Waterlox to dry to the touch, then do three of the shelves and wait for them to dry and then do the last shelf.

After the Waterlox was finished drying on everything, I went ahead & sanded it. I didn't have 320 grit paper, but I used 400 grit. The pictures below show how everything looked after these two steps were done.

Here are the two carcases, the upper on the left & the lower on the right. Those are the shelves piled up on top of the lower carcase.

These looked great, but the color is still wrong at this point. It's much too light & yellow. It needs to be a darker brown. The following glazing step will give the wood the color that I'm looking for.

And here are the doors, the upper door on the left & the lower door on the right.

So the next step is to glaze everything with walnut gel stain. When I worked on the samples, I had three sample boards with two of them split in half so I could try different combinations of things. I effectively had 5 different samples to work with.

The first thing I found was that the wood color turned out about the same no matter how long or how much dye I put on the wood. That's why I got the dying done sooner that I thought I'd get to it. Since I only had to apply one coat of Waterlox Original, that really wasn't going to make much difference in the final color. The whole point of applying the Waterlox was to seal in the color of the dye.

So when I got to the glazing step, I tried putting it on & wiping it off immediately on one sample, and I would let the others stand for 5, 10, 15, & 20 minutes. What I found was that the grain of the wood had more to do with the final color than how long I left the stain on. I decided to try waiting 5 minutes between wiping the stain on & wiping it off when I did it for real.

I started glazing the interior first. And I discovered an interesting thing: the plywood's face consisted of a number of veneer strips laid side by side. Even though the grain of these veneers looked strikingly similar bare & after dying, the final color after glazing varied significantly. And I don't know why. One lighter colored strip was bordered by two darker strips that looked to be the same color. It'll be OK when done, as it will be darker inside the cabinet when it's in place & I was using a 500 watt light so I could see what I was doing. But the color difference amazed me.

The exterior surfaces all came out about as expected, and now the color is strikingly similar to the dining room set. I've got the effect I wanted, so far. Here are some pictures of everything after the glazing step was finished.

The lower carcase is on the left & the upper carcase is on the right. And the shelves are stacked on top of the upper carcase. I haven't gotten any glazing done on the shelves yet. With today being Mother's Day, I didn't get any time to do anything today, so I should be able to knock them out after work tomorrow night. But I am very happy with the carcases so far.

The two doors are in the next pictures, with the upper door on the left & the lower door on the right. They look a lot darker in these pictures than the carcases do, but the lighting is different. Everything should look the same when it's all together.

That brings everything up to date. As I said, I can finish the glazing step on the shelves tomorrow night, and then I'll be able to get started applying the finish. I'm considering trying a couple of coats of poly on a sample, but we'll see.

Monday, May 5, 2008

More on Table Saw Safety

Last time, I wrote about a kickback accident I had on my first table saw while making the runners for a crosscut sled. Today, I’m going to talk about a kickback accident I had recently. I even posted about it & included a picture of my gut to show the results of the accident. And yes, I’m afraid I’m going to break my promise not to show any more pictures of my gut on this blog. Maybe the horror of seeing my flab will help keep someone safe!

If you will recall, I was working on the crown molding for the corner cabinet. I had not cut all of the stock identically and I had to bevel rip a little bit off of the edges to get a better match. The board in question also had a miter cut on the end I had to push on. But I did not let this stop me.

I beveled the blade to 45°, set up my GripTite magnetic feather board to hold the stock against the fence, and used a push shoe to push the stock through the saw. Everything was going along OK, though I was a little apprehensive of this cut. Something did not feel right. But I did have the feather board set up, and I was using a push shoe, so I figured I had everything set up safely enough.

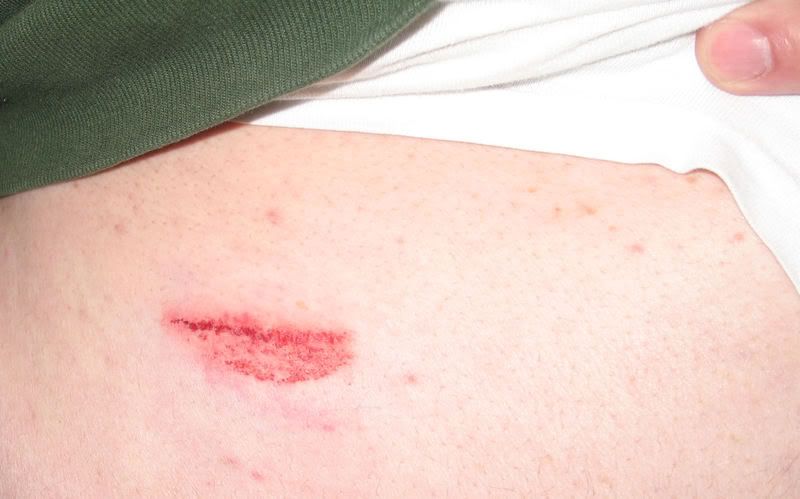
Yet, near the end of the cut, the stock managed to rotate counter clockwise behind the blade, and it came into contact with the rear teeth on the blade. Next thing I know, wham! I’m hit by the stock on my right side, over the lower ribs. Here’s how the bruise looked when it happened.

That did hurt a lot, but not as much as the saw ripping through my thumb did. My current saw is a Craftsman Professional 10” hybrid table saw, model 22124. It has a 1 3/4 HP induction motor on it, so it’s a lot more powerful than my old bench top saw was. And it can kick like a mule.

So, what went wrong? With the advantage of hind sight, I have been able to pick through this accident and identify more things I did wrong than I could back when it originally happened. So here goes.

  1. The first problem was the way I set up the cut. Yes, the feather board & the push shoe were good things to use, but by themselves they were not enough. If you look at the picture of the stock below, you’ll see that I was pushing it through with the narrow face down on the table. While this reduces the amount of tear out that might occur along the top edge, that molding is much more unstable resting on that face than it would be if I put the concave face down. This is just asking for trouble.
  2. If I had put the concave face down, I would have had to move the fence to the left of the blade to make this cut. I don’t think there is anything wrong with moving the fence, even though the blade would have been angled toward the fence & would have trapped the work piece. The work piece would have been a lot more stable in that configuration, and that probably would trump the non-captured cut with the fence to the right of the blade.

  3. I should have used a feather board to hold the work piece down on the table. The added pressure holding the stock down would have helped, no matter where the fence was or the orientation of the work piece.
  4. I was pushing on an end that was not square but cut at an angle for a miter. The direction of the angle contributed to the tendency of the work piece to rotate counter clockwise. A feather board placed behind the blade, or even just using a splitter would have made this a safer operation
  5. Perhaps a push block like the Grrrrripper would have been a better choice for this cut. Though the need to push right over the blade with the Grrrrripper, gives me the heebee geebees. After what happened to me when I last put my hand over the blade, I’m not looking forward to trying it again.

The bruise has long since healed, but I still have a scar on my flank over my rib cage to remind me of this accident. There’s nothing quite like stepping out of the shower in the morning, looking at yourself in the mirror, and seeing a reminder of your last big mistake at the table saw. It makes you think twice about what you’re doing the next time you step up to the tool.

I have had other kickbacks occur while using my table saw, but I managed to evade injury those other times. In other words, I got lucky. In fact, I may have had one occur a few minutes before I nailed myself with that piece of molding. Let’s face a few facts:

  • Any time a kickback happens, you’re doing something wrong. You really need to stop & think about what you’re doing when it happens before you try anything else with the saw.
  • It’s probably a better idea to go work on something that does not require the use of the table saw. Just getting away from it probably will help you find a safer way to make that cut when you come back to it later.
  • It might even be best for you to turn off the lights and go do something else for a while. As hobbyists, we have the luxury of not being under deadline pressure to get the job done. No matter how much our wives might complain (not that mine ever has, but I’m just saying). We should not let ourselves feel any need to rush & compromise our safety.

Lastly, if you find yourself getting angry or frustrated, that’s when you walk away from anything with a sharp edge on it. Before you hurt yourself, or anyone who happens to be in the wrong place at the wrong time saying the wrong thing.

Sunday, May 4, 2008

Let's Talk About Table Saw Safety

Welcome to Woodworking Safety Week at Tony’s Woodshop! As a member of the Wood Whisperer Network, I’ve decided to participate in this important event and include a post or two about working safely in your shop. It’s important to remember that the tools we work with, especially power tools, are equally capable of cutting through flesh and bone as they are of cutting through wood. If you’re at all attached to your fingers (pun intended), you need to use safe practices whenever you use any tool. Remember, the tool can’t hear you scream!

So first, I want to talk to you about an injury I had about 4 or 5 years ago while using my table saw. I’m going to describe what happened first, then I’m going to discuss how the whole thing could have been prevented.

At the time of this accident, I had a Craftsman bench top table saw. I had received the saw as a Father’s Day gift the previous year and I was still very excited about owning it. I had just joined the WoodNet forums within the past year, so I was very excited about making things using all of the techniques & tips I had read on the forum.

As with all table saws in this class, the saw had a universal motor that was connected to the blade by a “direct drive” mechanism. There was actually a belt & two pulleys in a little plastic box that connected the motor to the blade, but you could still bog that saw down without trying too hard. And I even managed to do it once or twice.

I used to keep this saw in my tool shed and carry it outside when I needed to use it. Yes, I used to literally pick it up & carry it. It only weighed about 70 or 80 pounds. I used to set it up in the backyard about 10 feet or so in front of the shed. I worked out there so much that year that I wore down a bald spot in the lawn in that area.

I had decided to make a crosscut sled for this saw. I used a plan that originally appeared in an issue of Woodsmith or ShopNotes. I found it in a book that was sent to me as a gift for subscribing to Woodsmith magazine called “The Ultimate Jigs & Fixtures Book”. It had replaceable inserts for making beveled or 90° cuts and a secondary fence for making mitered cuts. It looked like a good design to me, so I built it.

I had reached the point where I had to make & attach runners to the bottom of the completed sled. Even though the plan called for just one runner, I wanted to put two on the sled. My reasons were based on some posts I had read on WoodNet arguing that double runner sleds stayed more accurate year round despite temperature changes. This was good enough for me.

So I got started making the two runners. But there was a problem.

The saw’s stock miter gauge was both substandard and nonstandard. It was nonstandard in that the miter bar & the miter slots were oddly sized & shaped. As you can see in the drawing at the right, the bar was shaped like an upside down “T”. It was also less than ¾” wide and less than 3/8” tall. But these were the slots the saw had, and I needed to make runners for the sled that would fit into those slots.

So I took a 3/4” thick oak board I got from Home Depot & ripped off two pieces the width of the miter bar, plus a hair more. I wanted to make sure these runners fit into the slots snugly. Then I turned the pieces on edge & ripped them to the proper thickness. Lastly, I lowered the blade so it was 1/8” high & set the fence to cut the corners away. The rabbets I had to make were less than a blade width wide, so I only had to make one pass per rabbet.

As I cut the rabbets, I found that the stock rose up & I didn’t get a consistently deep cut along the length of the runner.So I placed my left hand right over the blade, with the stock between the blade & my fingers, and pushed down while pushing the stock through. I even used my left hand to pull the stock backwards over the blade once or twice to make sure the blade cut full depth.

Well, I got away with this once or twice, but then it happened. The blade teeth caught on the runner stock & shot it out of there like a bullet.I later found the runner about 25 feet away from the saw in the back of the shed. So even though it was an underpowered saw, it had quite a kick.

When the stock disappeared from under my hand, my left thumb contacted the blade. Lord, did that hurt! I remember feeling the blade’s teeth passing through the spot where flesh had been. And it hurt, a lot! I’ve felt worse in my life, but this is something I never want to experience again.

I grabbed my thumb, somehow shut off the saw, and went inside. Luckily, the blade was only 1/8” high, so I didn’t cut anything off except some skin & the corner of my thumb nail. And I didn’t have to go to the emergency room. I just cleaned it, put some gauze on it, and wrapped it in adhesive tape. And went back to work on the runners.

The good news is everything healed & grew back normally, though I do have a 1/2” or so long scar on that thumb to remind me of my mishap. But how did this accident happen in the first place? There were a number of things that went wrong, all of them my fault & preventable. So let’s analyze what I did wrong.

  1. First, I ripped the two runners from the stock and then milled them. These pieces were much too narrow to safely mill them like I did. What I should have done is:
    • Ripped a piece at least 2” or 3” wide off of the oak,
    • Ripped that larger piece to thickness, or even better, if I had owned a thickness planer at the time, I should have planned the piece to thickness.
    • Next I should have cut the rabbets, and finally,
    • Rip the two runners off of the bigger piece.

    The larger piece would have kept my hands farther from the blade and so could have been worked much more safely than the two narrower pieces. With the narrow pieces, my hands were just too close to the blade.

  2. When I found that the rabbets weren’t being cut full depth, I should have attached a feather board to my fence to hold the stock down instead of using my fingers. If the board kicked back with the feather board in place, my hand wouldn’t have been in danger of falling into an exposed blade.
  3. Third, never ever run stock backwards through the blade! Of all the things I did wrong, this was by far the stupidest. The other two things I did wrong I can put down to having been a newbie and not knowing any better, but even the saw’s manual tells you not to do this. And I always read the manual whenever I buy a new tool. I knew better, but I got away with it a few times & the warning just flew right out of my head.

Finally, I got lucky. It was pure dumb luck that the blade was only 1/8” above the table when my thumb dropped into it. It was pure dumb luck that the blade only cut through the fleshy part next to the nail. This injury could have been a lot worse. As it was, it took over a week for the throbbing to stop, and close to two months for it to heal to the point that just bumping it into something didn’t hurt any more.

This wasn’t the worst injury anyone has ever suffered while operating a table saw, but it was the worst one I’ve ever received. And now, when I’m thinking of using my table saw to make a tricky cut, I listen to that little voice in my head that tells me “don’t do it that way!” I use feather boards when they’re called for, and I always use a push shoe if my hand is going to be within the “red zone” (that area where the throat plate sits. It’s painted red, so it’s the red zone).

As Sgt. Estherhouse used to say on “Hill Street Blues”, let’s be careful out there!