Saturday, October 23, 2010

Change in Plans

I'm going to start building the coffee table soon. But first, I have to put away a ton of stuff that has accumulated in the shop in the almost 2 years since I finished building the pulpit.

In 2009, I created a post on WoodNet's Off Topic forum descrying my lack of funds for doing woodworking. I had all this free ime on my hands but couldn't afford to buy any wood to make anything. In addition, I had bought a Rikon Mini Lathe 3 weeks before I was layed off from my job and I didn't have any turning tools Lathes, drills, and routers are all alike in that the tool by itself isn't much good without the accessories, after all!

Much to my surprise & gratitude, the guys on WoodNet rallied & sent me about 70 bd ft of quarter sawn red oak and 6 or so different turning chisels and a number of other turning tools, like a pen mandrel and other things for making pens. I really don't know what all of the tools I was sent are called; I'm going to have to spend some time researching it.

So I went into the shop today & cleaned the dirt off of the table saw top that had accumulated & began putting things away. Then it hit me: I have no where to put the turning tools, and a lot of the clutter on my "bench" / temporary work table is the turning stuff.

So after I finished cleaning the tablesaw & spraying on a new coat of T9, I sat down with SketchUp & whipped up the drawing at the right.

The whole thing will be made from scraps of plywood I have left over from my previous projects. The whole thing stands about 30" tall and is 19 1/2" wide. The inside width is 18".

The 6 chisels I have, plus the roughing gouge & spindle gouge I bought a few months ago will be stored in the upper area. leaning back against the ribbed strip at the top. There's a 1/2" tall lip attached to the front of the shelf to keep the bottoms of the turning tools from sliding off of the shelf. The handles of my tools are all about 1 3/4" in diameter at their widest points, so I alloted 2" of width for each one. There will be room for a couple more gouges once I've got my existing tools in it.

I'll store the pen mandrel and other turning related stuff that isn't a gouge or chisel in the drawer. The drawer has through dovetails front & back. The front, back & sides will be made from 1/2" solid wood. It's about 4" tall & 5" deep. I thought about making 2 drawers & I may do that in the end. An 18' wide drawer may be a little unweildy.

The cabinet will be mounted to the wall using some screws. One day, I hope to replace the shelves on the walls with a bunch of french cleats & make cabinets & other tool holders to mount to them. I will turn this into a french cleat mount at that time.

I'm going to make a simple board with 3 pegs for hanging up extension cords, too, but that is too simple a project to show. It will just be 1 piece of 3/4" poplar 2" tall & 32" wide with 3 1/2" diameter dowels 7" long sticking out of it at a 15 degree angle. The pegs will mounted on 14" centers. That way I can get my extension cords out of drawers & hanging on the wall. Then I can put other stuff away.

Thursday, June 24, 2010

Update

No, I didn't fall off the face of the planet. I'm taking a course on .NET programming, and it's eating up most of my time. It's like going to work every day -- the class starts each day at 9 am, ends at 5 pm, with 15 minute breaks in the morning & afternoon & an hour for lunch, Monday through Friday. I had more free time in the course of a day when I was actually working.

I will do a post on the coffee table, but right now, I'm stretched pretty thin:

  • In addition to this class, I'm in the honors program, which means I have to tutor my fellow students for 10 hours a week. I have one student I'm tutoring and it's going well, but this does take time away from other interests
  • I have to take a Microsoft certification exam next Wednesday, and I haven't taken any practice tests yet.
  • I have to prepare a special project and present that to my class near the end of the class. I know what I want to do, just haven't had time to do any work on it
  • My wife & kids expect me to be available for them, too. Luckily, summer vacation has started & the need for help with homework isn't there till September. But they do expect other things of me.
  • I'm busy in my church & have things I owe to them that I have been putting off.

So I'll get to the coffee table, I just don't know when. And I really do want to get started. I even cleaned my table saw's top & put Boeshield T-9 on it last weekend!

So that's all for now. More later, when I can breathe & think wood.

Monday, May 31, 2010

There Has Been a Design Change

There has been a design change to the coffee table. I posted a couple of the pictures in my last blog post in a thread on WoodNet & got a range of feedback, mostly that the drawers were too big. So I decided to add two more drawers 2" high above the existing drawers. I don't know if they'll make the tall drawers look better or not, but they do add additional storage, which is a good thing.

So here are some renderings from SketchUp of the new design.

Here is the coffee table in an isometric view. You can clearly see the new drawers, which are 2" tall in total. The sides are now all 13" + wide. There are going to be three tenons 3" long on each one. I also realized that I'm going to have to glue & peg the top tenon into the legs, but leave glue off of the middle & bottom tenons. These will need elongated slots cut in them with pegs going through the slots & glued into the legs. These will keep the top of the side in the same place with regard to the top & allow the sides to expand downward with seasonal movement.

This is the front of the new design. Both sets of drawers will be able to be opened from either side. I will use some rare earth magnets mounted in holes drilled into the drawer openings on all 4 sides, and similar magnets mounted in holes drilled into the drawer fronts & hidden under thin plugs. The magnets will all be oriented so they attract each other. These should help keep the drawers aligned to the apron face. I don't know how many I'll need; I will have to experiment.

I got an interesting tip on WoodNet to use something called "Nylo-tape" instead of wax on the drawer glides. From what I can gather, this is some kind of tape, adhesive on one side, that is slick & will allow the drawers to pull open easily. This lead me to think about making the drawer glides & guides out of UHMW. I don't know if I'll do it, but it is a thought!

This is the bottom view. Except for the new drawers sticking out, there really is nothing different to see here. An interesting change is now there will be three dust frames to build. The middle frame will have two 1/4" deep dadoes cut in the top & bottom of the center rail to accept drawer dividers. I expect the carcase of this piece to be strong as steel & not to rack at all.

Also, since the legs will be joined to the sides using mortice & tennon joinery, they won't give us the headaches the existing table's legs have given us. The legs on the existing table are removable. These legs are made from 2 3/4" thick pieces glued to each other in an "L" shape. At the top, there is a block with the ends mitered at 45ยบ that was glued to the inside of the legs. These blocks have lag bolts driven into them. These bolts fit through similar blocks attached to the undeside of the table top. The legs are held on by a washer & nut.

Well, these blocks were glued & finish nailed to the inside of the legs. Over the years, the glue has failed & the nails were pulled out on a couple of the legs. I've epoxied the blocks back on, and the repair is holding for now. I just don't know how long the repairs will last.

Here is the top view. Nothing much to look at, I'm afraid. But if you were standing on it & looking straight down, this is what you'd see!

That's enough for now. Next time I'll present the steps I'm going to go through to build this table.

Saturday, May 29, 2010

The Coffee Table's Design, or "You Want Drawers With That?"

It's time I introduced you to the coffee table. It's a Tony V original design intended to replace a coffee table we bought when we first got married almost 15 years ago.

There's a funny (as in unusual, not "ha-ha") story behind the coffee table the new one will replace. My wife is from the next town up from where we live now, called Mahopac, NY. When we got married, there was an unfinished furniture store not far from where we live today. We bought that coffee table from there. Today, the unfinished furniture store is gone, but that same store is now the Tool Nut, which is where I buy a lot of my router bits and other tools!

In any event, A lot of the furniture in the family room, where the old coffee table is, and where the new one will go, was purchased, or designed, to go with the coffee table. I think we even have an end table that goes with it in the attic. So I wanted the new coffee table to be reminiscent of the old one, but with some changes my wife wanted.

Essentially, my wife wanted the new table to have some storage in it so we could cut down on the clutter in the family room. My kids—well, actually, my son— has a lot of stuff in plastic bins that are tucked into various corners. Most of it is games & accessories for the Wii and the old GameCube systems we have. So I needed to add some drawers to the table that will allow us to get rid of the bins. It also needs to sit in the same footprint, as our family room is only 10' wide. Actually, it's on the other side of the wall that separates the wood shop from the house, so the new table won't have far to go once it's done.

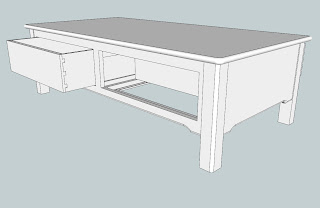
So here are some views generated from SketchUp of the coffee table as I have designed it.

Isometric View

Here is an isometric view of the table. As you can see, the drawers are designed to open from either side. This will allow the kids to get at some things from one side & other things from the other side, and allow us to use all of the space inside the table for storage.

The drawers, as designed, will feature half-blind dovetails. I've never made dovetails of any type, so this will be a first for me.

The drawers also will not use metal drawer glides. Instead, they are designed to sit on waxed wooden glides. There will be rare-earth magnets hidden in the sides of the apron & drawer faces that will help keep the drawers lined up with the apron when they're closed. At least, I hope they'll keep everything aligned!

Here is a front view of the table. This is pretty much how the table will look from the other side, too. The edges of the top are designed to have a full 3/4" diameter bullnose, just like the table it's replacing. Since the corners are also rounded, I'm probably going to have to make a full size template of the top and use a guide bushing in my router base to do the bullnosing. This will be pretty interesting to do!

The bottom edges of the all 4 aprons / sides have a decorative cut-out & 3/16" radius round-over. These I will be able to do with a regular bearing guided round over bit in my router table. This pattern, by the way, is taken from the existing coffee table.

The drawer fronts will be made by taking an over-width blank for each long apron & ripping them out. The parts, minus the draw fronts, will then be glued back together. This will allow the grain on the drawer fronts to match perfectly with the rest of the grain on the aprons. The drawer fronts themselves will then be ripped a little narrower to give them enough clearance for the drawers to open & not bind, and allow for wood movement.

Just for fun, I threw in this bottom view of the table. There will be two frames inside, one beneath & supporting the drawers, the other one identical to it & above the drawers, keeping them from tilting out when you pull the drawer out far. These will be dadoed into all four aprons / sides & cut out to go around the legs. The long grain on all four arpons / sides will run from leg to leg, so there will be no cross-grain issue with this construction.

The aprons / sides will be attached to the legs using mortice & tennon joinery. Due to their width (about 14", I think), there will be several tennons cut in each apron. I'll probably have to allow glue the middle tennon in and peg the others, with elongated slots cut through the tennons to allow the aprons to move. I'm not real clear on the proper joinery technique to use; perhaps some of my more knowledgeable readers can suggest something?

Finally, here is a top view of the table. It's nothing much to look at right now, really, but I figured I'd include it anyway.

Well, that's the coffee table! See you next time!

Next: Not another long list of building steps!

Wednesday, March 24, 2010

Starting Work on a New Project

Well, I'm blogging again, at least for another project. I have taken the past year or so off from woodworking & blogging due to my lack of employment. My job situation still hasn't changed, but what did change was the contents of my shed.

Last year, I wrote a post on WoodNet decrying my inability to build anything because of my lack of income. Well, the guys on WoodNet, particularly Bones and Gary G, got together & sent me a bunch of stuff, including 70+ board feet of quarter sawn red oak. I can't find the words to properly express my gratitude to these guys for what they've done for me. Let me just say "thanks," and realize that I wish I could say more.

Originally, I was going to use the wood to make a Roubo style workbench, as shown in Chris Schwarz' book, Workbenches: From Design And Theory To Construction And Use. I received the wood in October (it had to be shipped from Florida to New York, and the guys had a job finding some way to get the wood up here without it costing a small fortune. My thanks to Walt for making the trip!) Upon getting all that oak home, I put it in my shed to acclimate. And the cold weather set in.

Well, the boards are impressive. Some of them are more than 10" wide. Many of them are 5/4 thick. And the more I looked at the wood, the more I thought "I don't want to use this wood for a workbench!" I'd rather wait until I have a job & spend a couple hundred bucks for some construction grade doug fir & make a bench from that.

So I've decided to build a coffee table. Back in 2008, my wife asked me to replace the one we have in our family room, which is also made from red oak. She wants the new table to have drawers for storing the various Wii games & accessories that are littering the family room now.

So project coffee table is about to get underway! That is, after I clean out the garage and get a few other things done around the house . . .

Next time: The Design, or You Want Drawers With That?